SceneGraph Plus is an application to display and manipulate scene graph (mesh and material) resources.
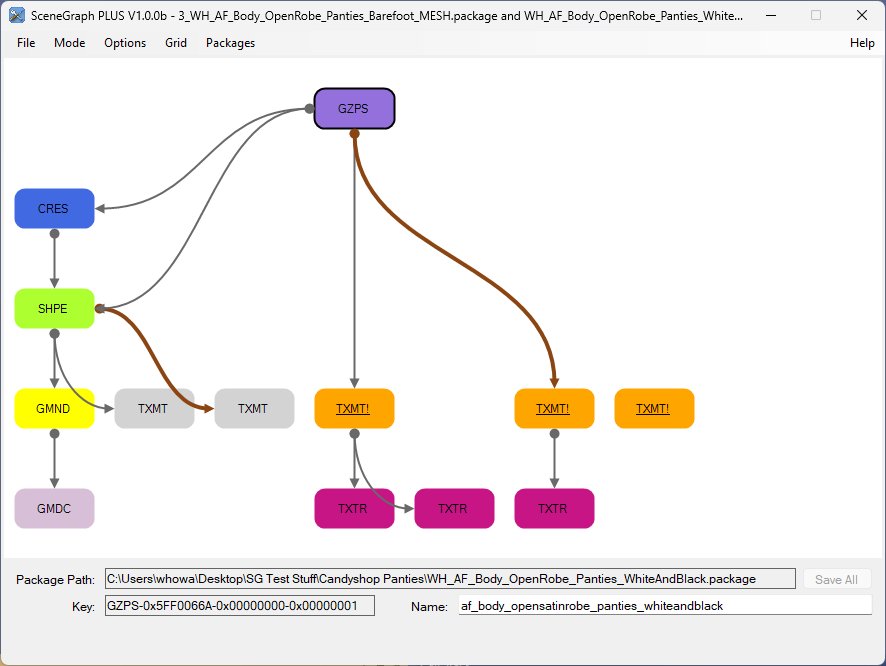
While it is similar to SimPe's scenegrapher, it has major differences:
- it is a standalone application;
- it can open multiple .package files simultaneously;
- it displays all connections between resources, and not just those in the chain starting at the "top-most" resources;
- it understands recolours (MMAT/GZPS/XMOL/XTOL), wall/floor coverings (XOBJ), fence (XFNC) and roof (XROF) scenegraph chains;
- it understands links from STR# resources (0x0085 Model Names to CRES and 0x0088 Material Names to TXMT);
- it supports renaming resources - maintaining the integrity of the chain (both names and TGIR values);
- it supports relinking resources - enabling broken chains to be repaired.
“I've just remeshed about 90 meshes (I had issues with the previous set), re-linking with PJSE would take a couple of hours, with Scenegraph Plus it's probably about 10 minutes. I'm still getting used to it, but it's so much easier than linking every single 3IDR in SimPE. Just an amazing tool.”
SimPe's Scenegrapher (Tools->ObjectTools->Scenegrapher or Ctrl-G) is a very useful tool for checking a scenegraph ...
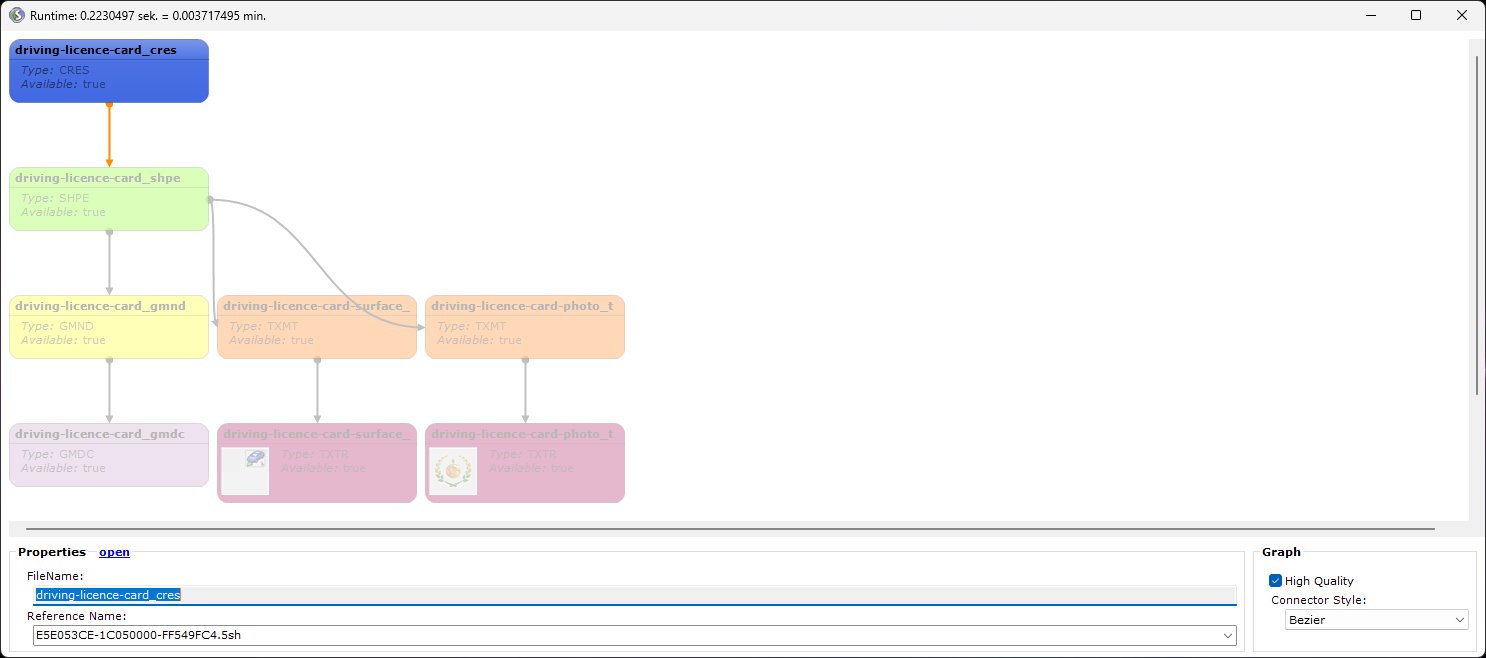
... when the scenegraph is correct, but not so good when there is an error.
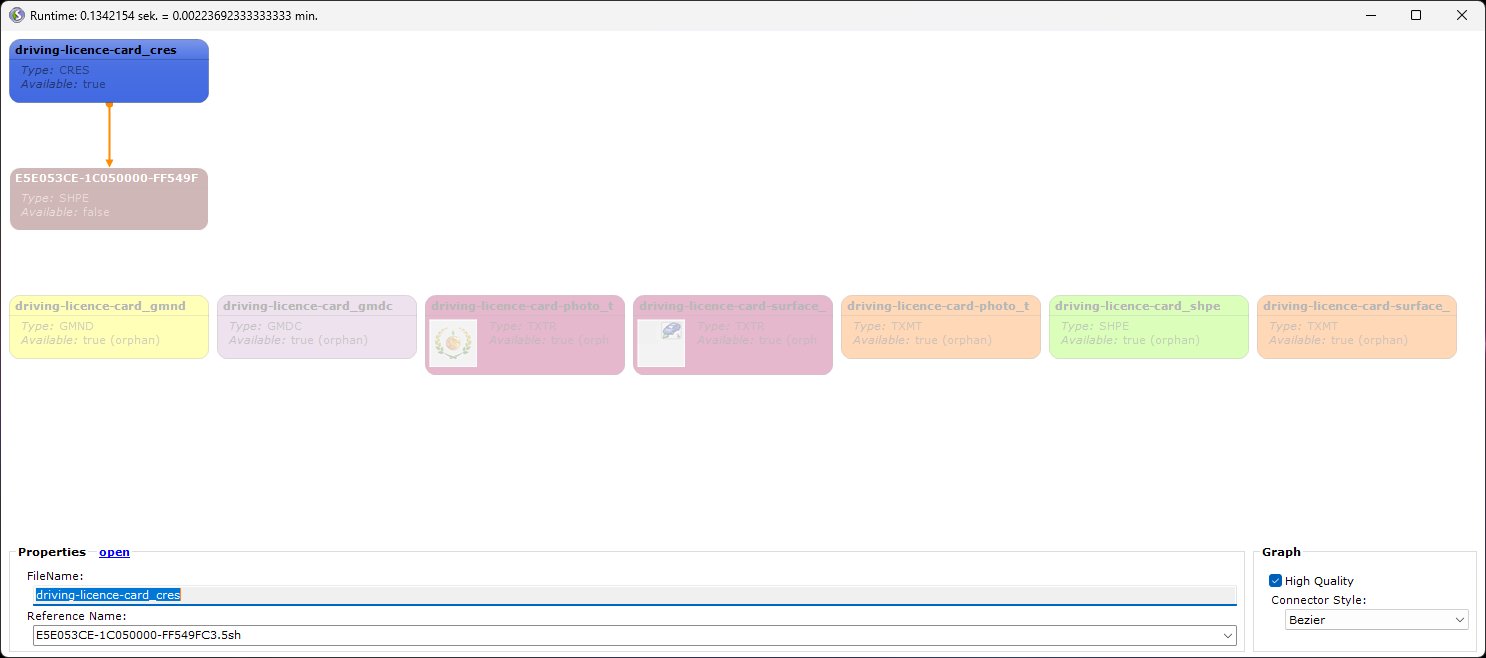
It's obvious there's an error in the CRES -> SHPE reference, but what about the rest of the scenegraph? Do any of those references also need fixing?
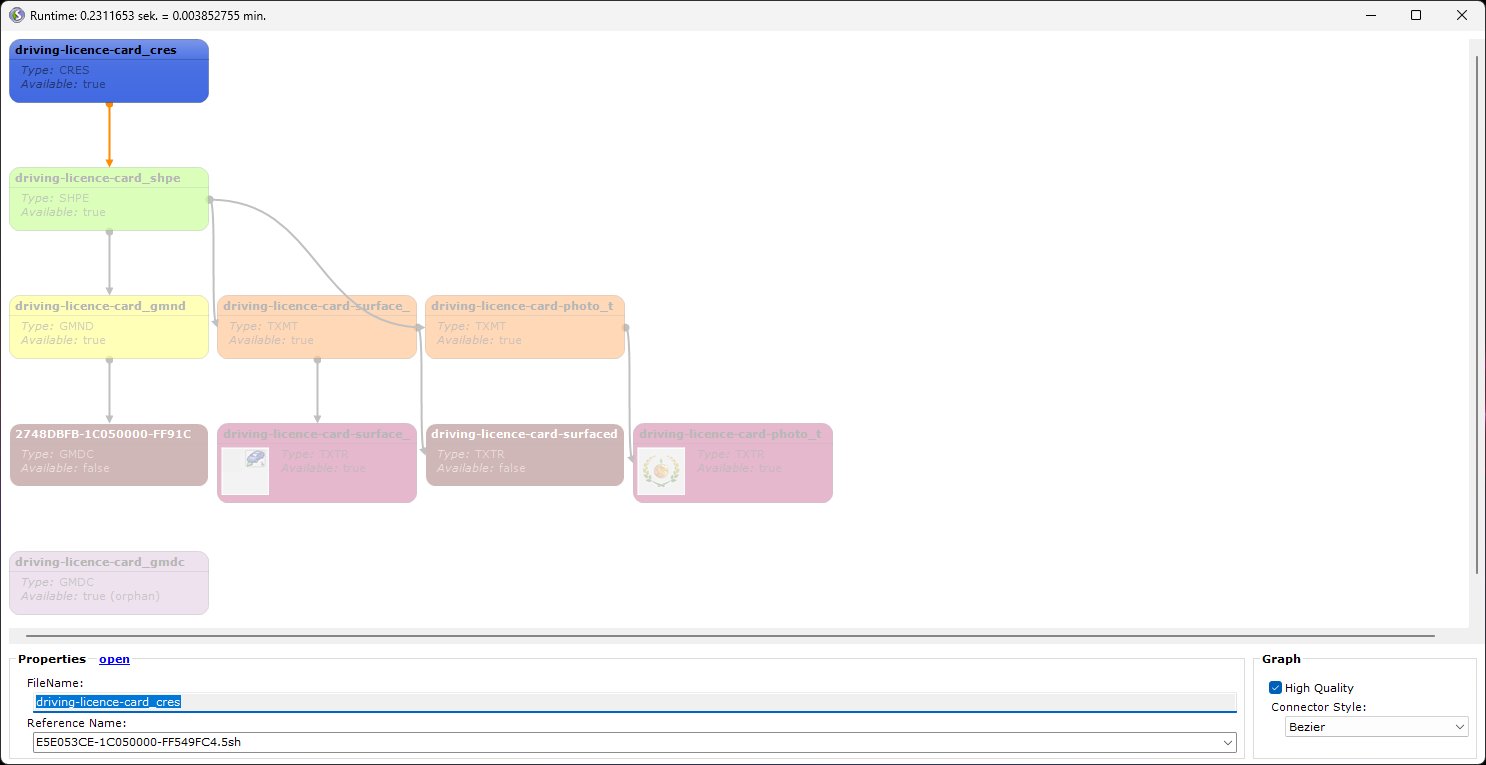
Would have been useful to know that the GMND -> GMDC reference also needed fixing, and the TXMT has a "weird" issue (a File List entry does not match the stdMatBaseTextureName property).
Unfortunately, when it comes to clothing recolours it fails totally ...
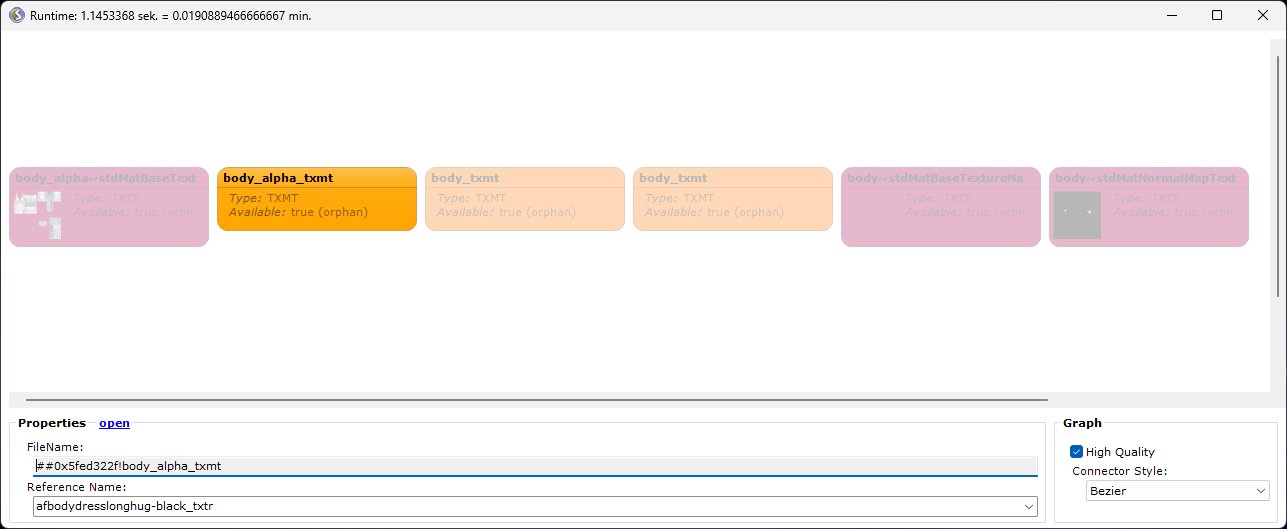
... not even displaying the GZPS resource (although it will display MMATs for object recolours).
And it can't handle resources across multiple files, for example, when material (TXMT/TXTR) resources are held in a separate .package to the main mesh (specifically the SHPE links).
SceneGraph Plus was designed to address these issues.
To open a .package file, use the "File" menu's "Select Package" option, or select a "Recent Package" via the "File" menu, or drag-and-drop the .package file onto the application.
For a correct scenegraph, it appears very similar to SimPe's Scenegrapher.
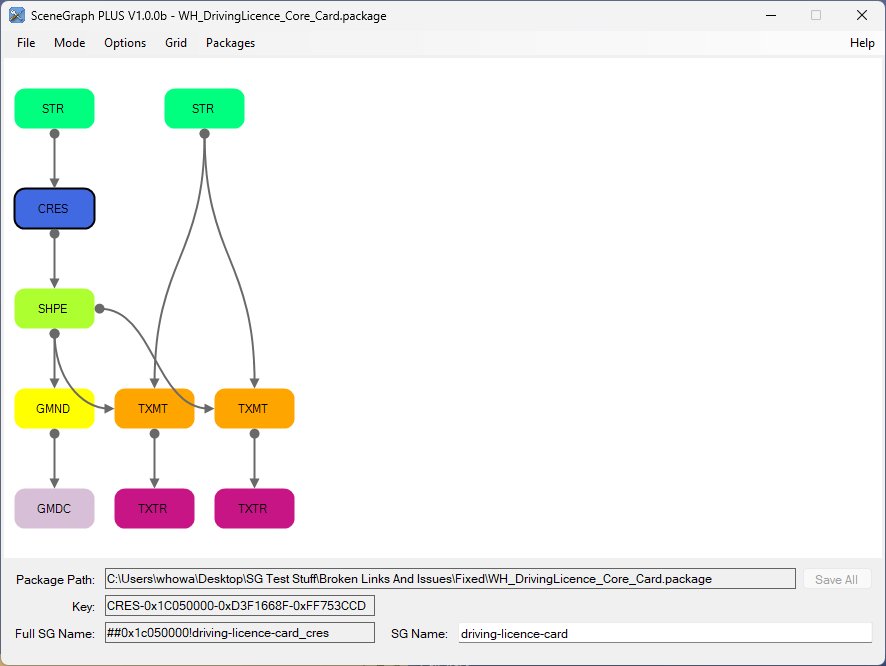
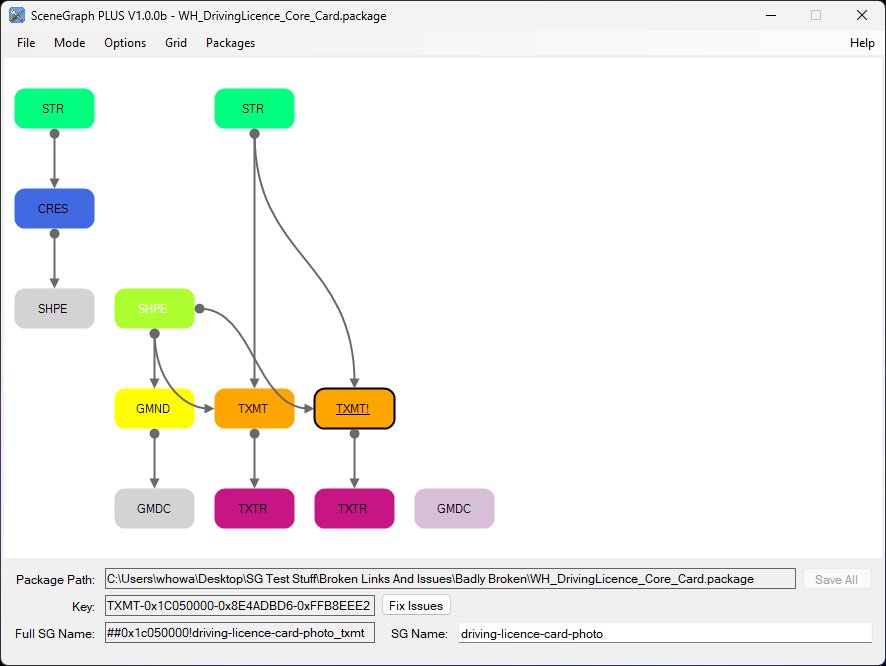
But for an error in the CRES -> SHPE reference, it still displays the rest of the scenegraph - which we can see is correct.
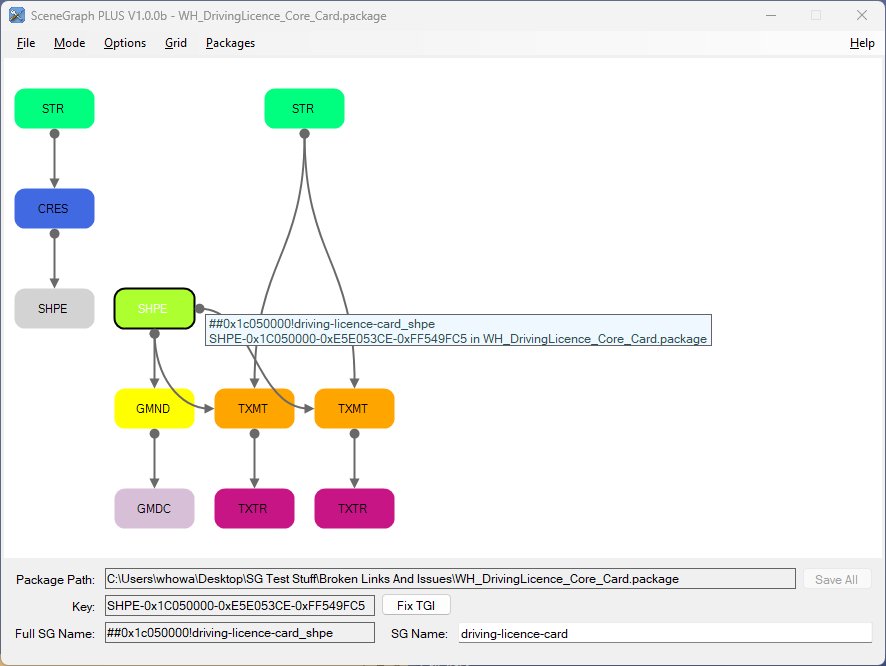
From the display (white text of SHPE and also the "Fix TGI" button is available), the error is clear.
If there had been other mistakes in the scenegraph, they would also have shown up.
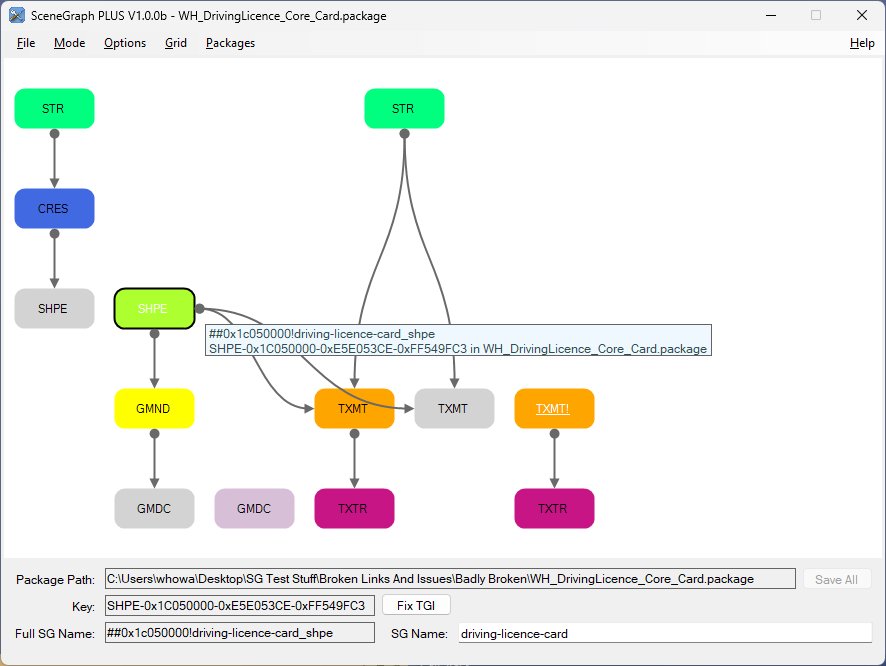
Clearly there is also an issue with the GMND -> GMDC reference and there is something wrong with one of the TXMTs (underlined with an exclamation mark).
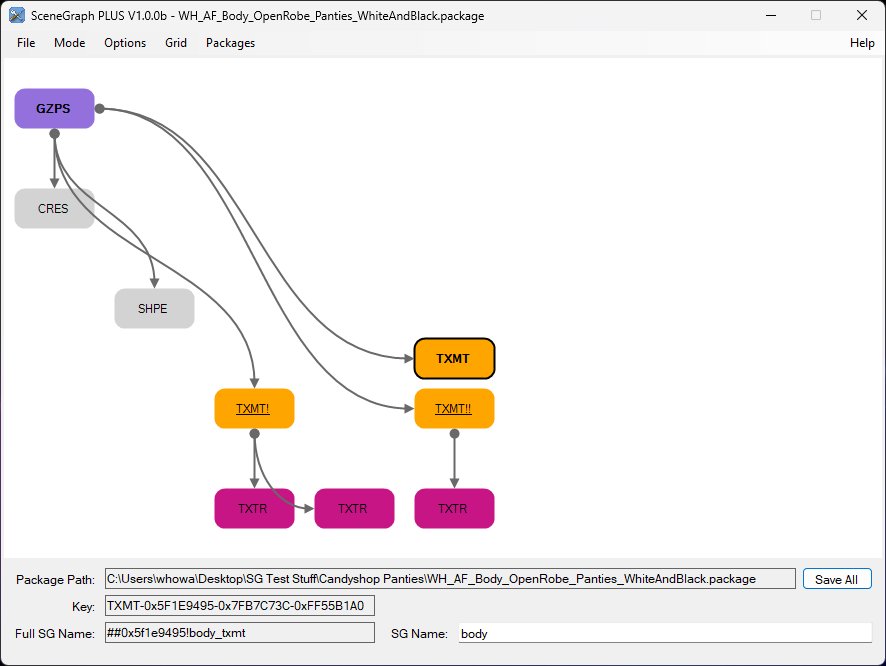
Scenegraphs for clothing recolors are displayed
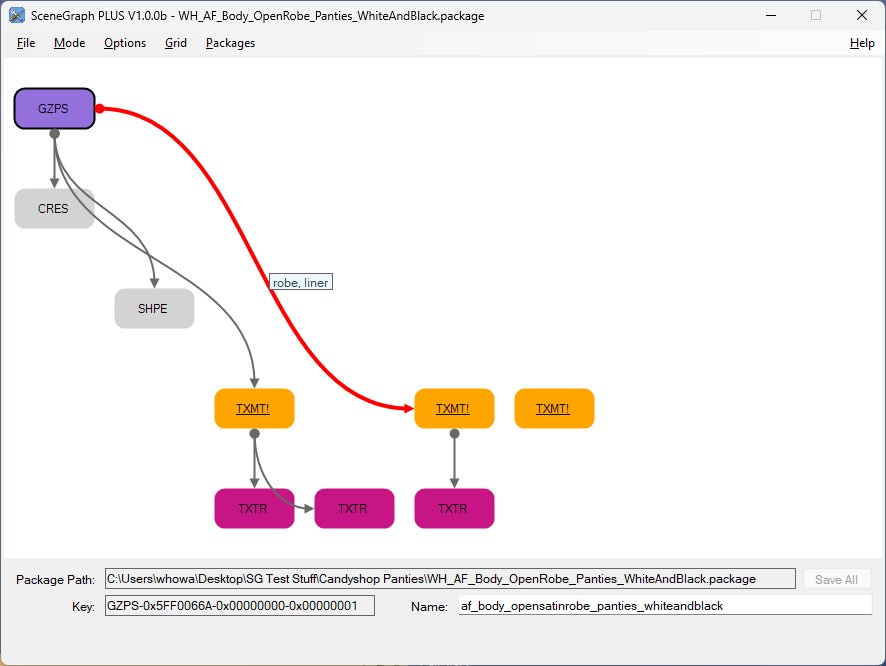
Note: In addition to a resource having references to multiple child resources (for example the GZPS to each of the CRES, SHPE and TXMT resources), a resource can have multiple references to the same child resource. In this example, the GZPS has multiple references to the same TXMT, as indicated by the thicker brown connection, as both the "robe" and "liner" subsets use the same material.
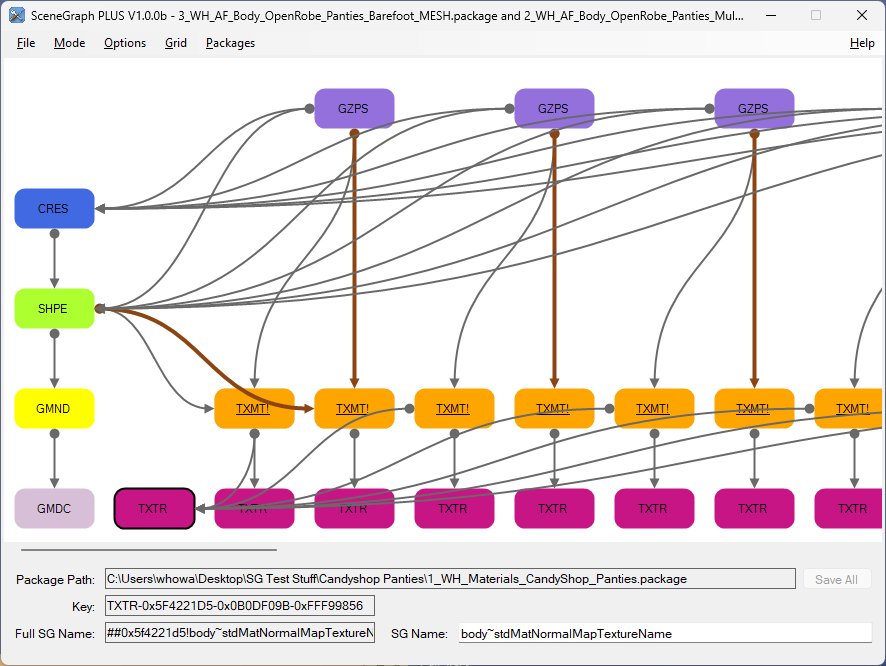
And if the scenegraph is split across multiple files (mesh and recolour in this case), the scenegraph can be built from multiple files.

Even with the mesh in one .package file, the recolour info (GZPS resources) in another and the required materials split across two more files (one for the robe and one for the underwear in this case) - for a total of 4 .package files containing the full scenegraph chain.
A short (8 minutes) video introduction to the basic features of SceneGraph PLUS.
Note: The audio is very low for some reason :(
If we have a complex distribution of resources across many .package files, for example,
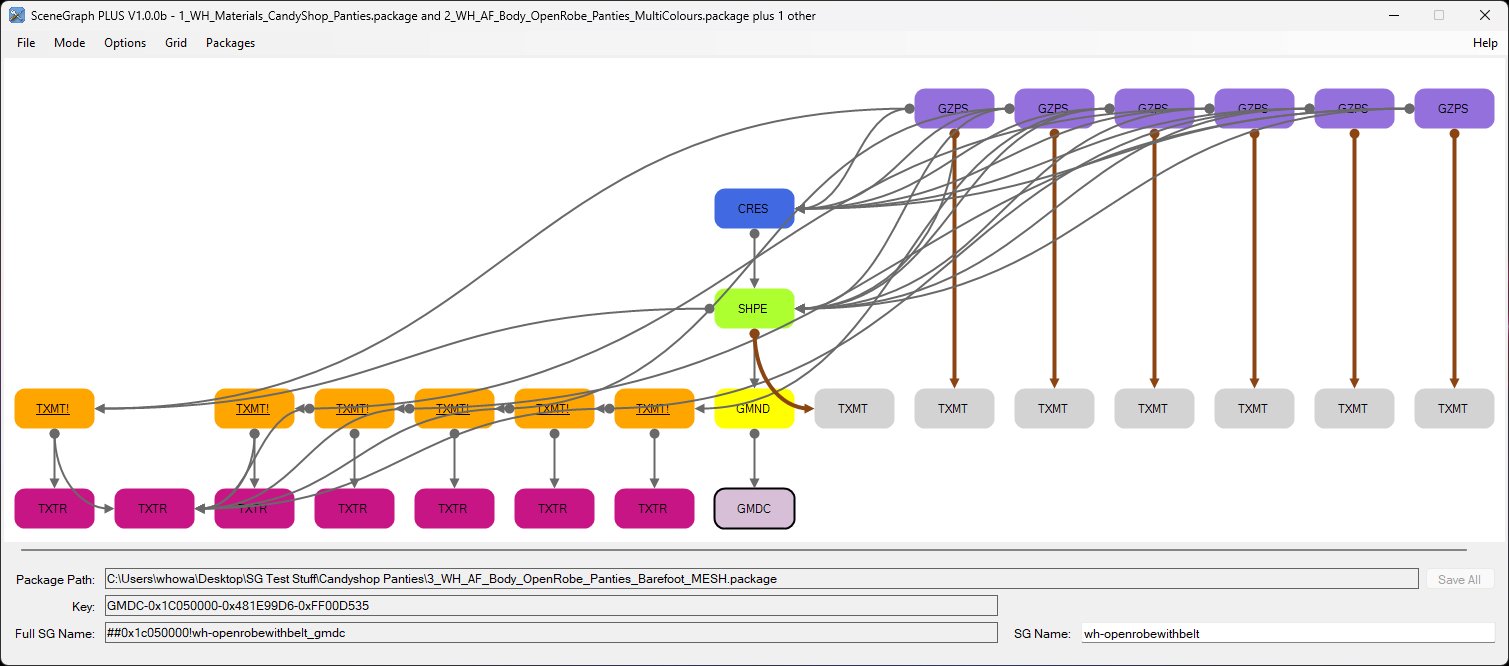
and only want to work with a subset of the scenegraph, from the "Options" menu we can select "Hide Missing" (or press Ctrl-H) and any missing (gray) resources will be hidden.
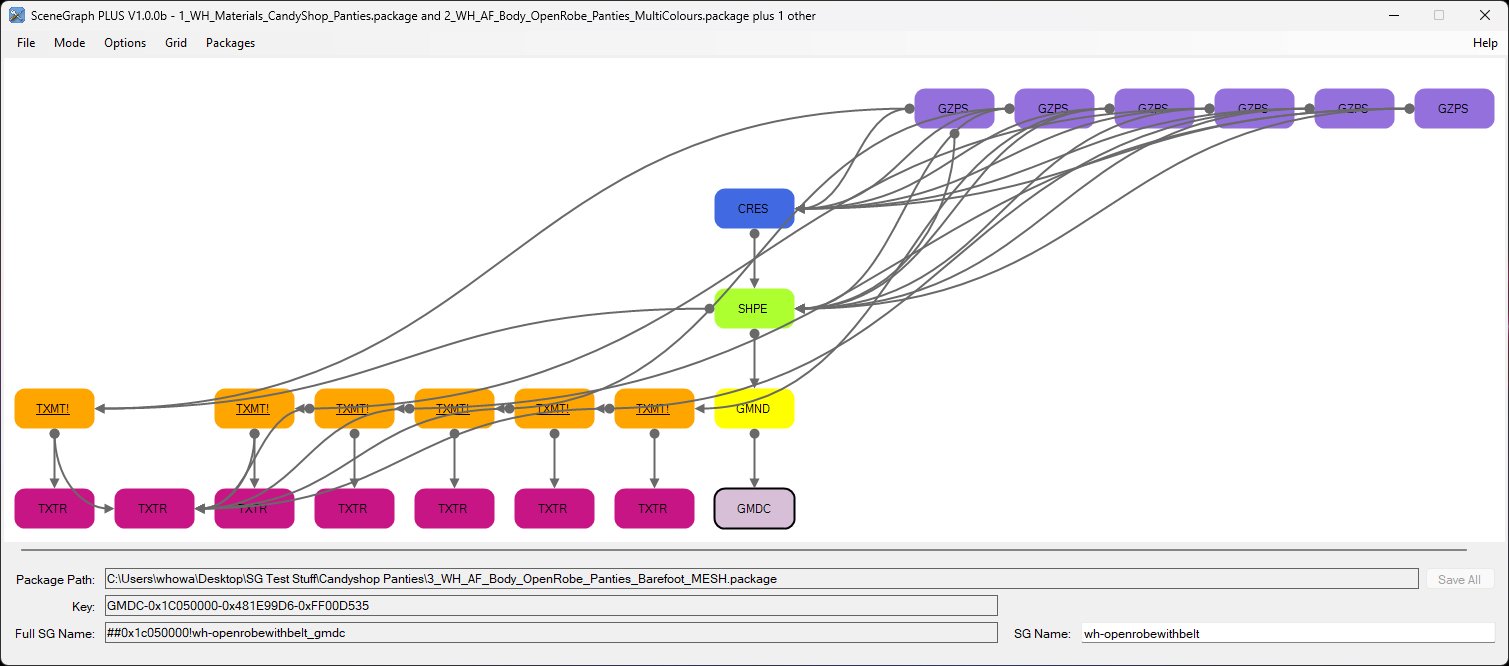
We can drag-and-drop resources around manually, or, from the "Grid" menu we can select "Realign To Grid" (or press Ctrl-G) to let the app make its best guess.
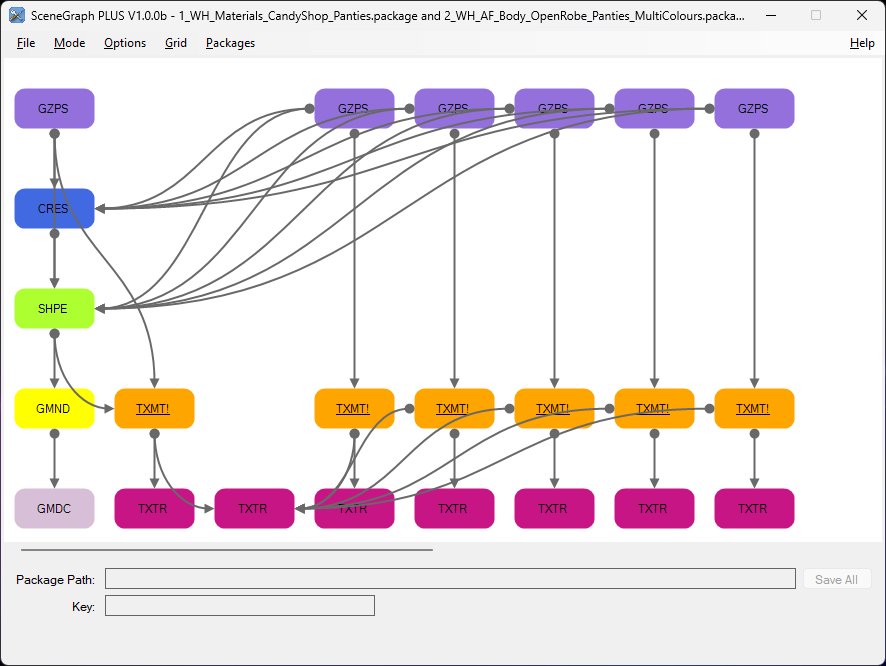
We can also change if the connectors pass under or over blocks from the "Options" menu.
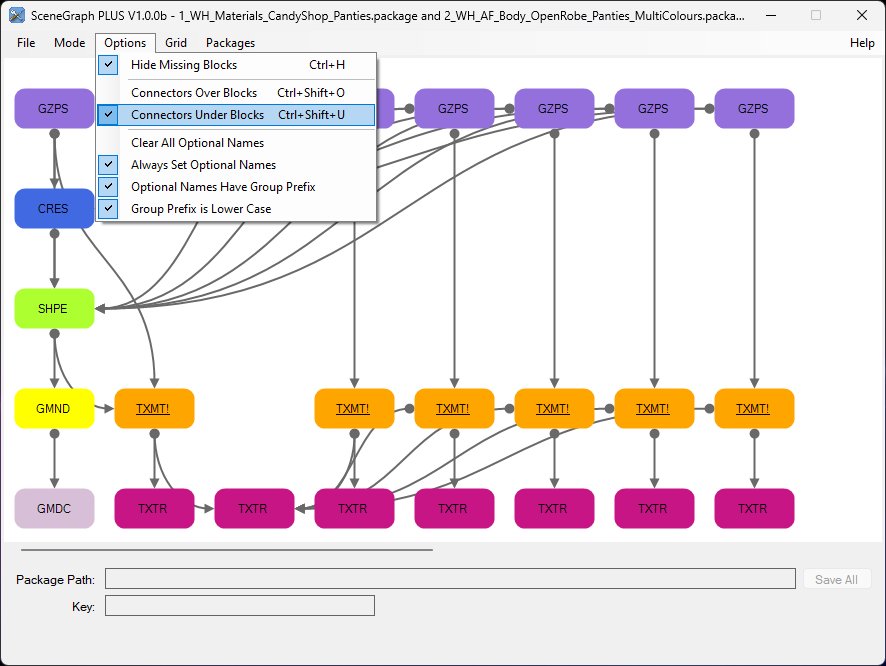
Hovering the mouse over a resource will show its name, key and package details.
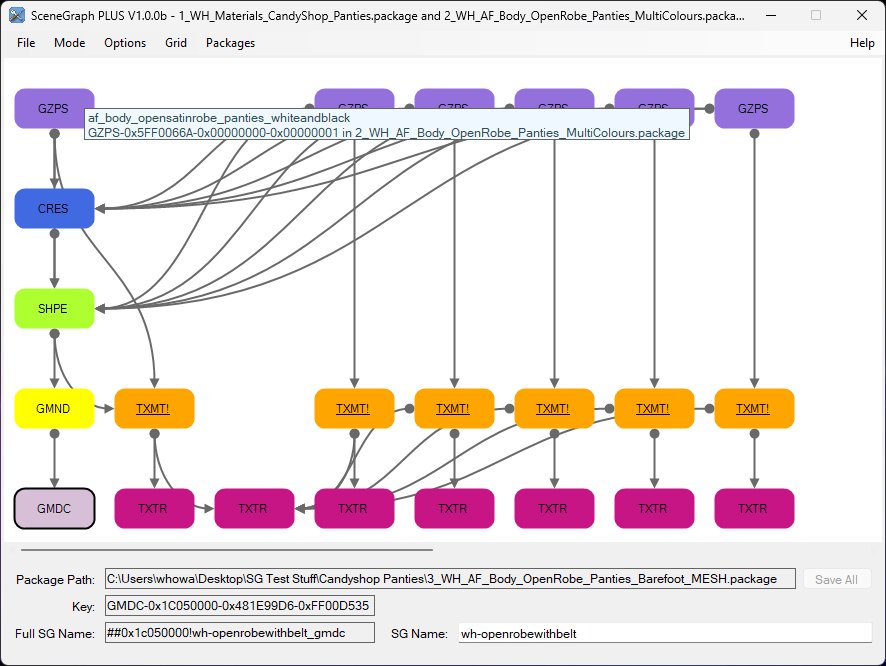
Hovering over a connector will highlight it and show any subset/group or property it is related to.
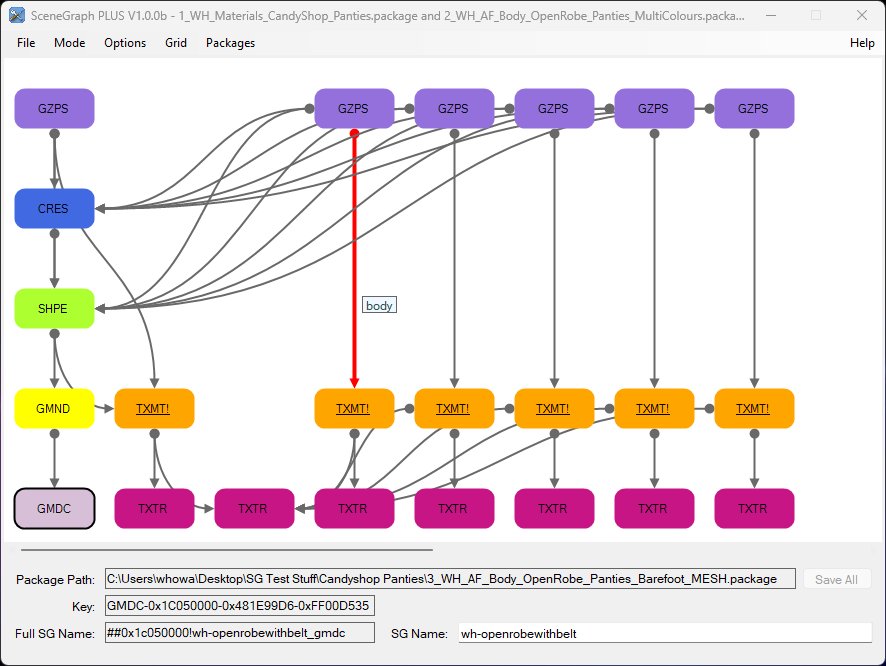
Clicking on a resource brings up its details in the lower panel ...
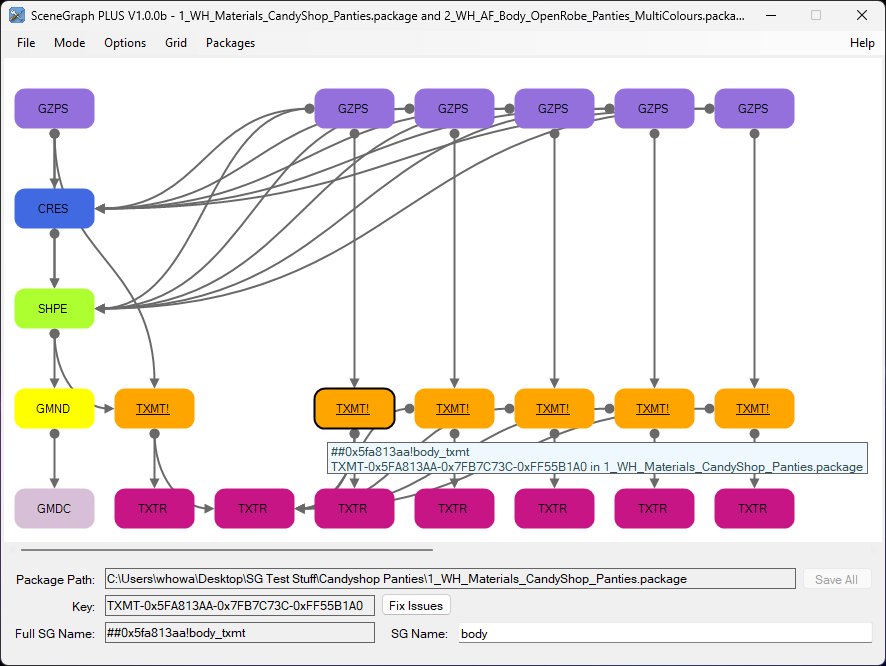
... from where we can change its name.
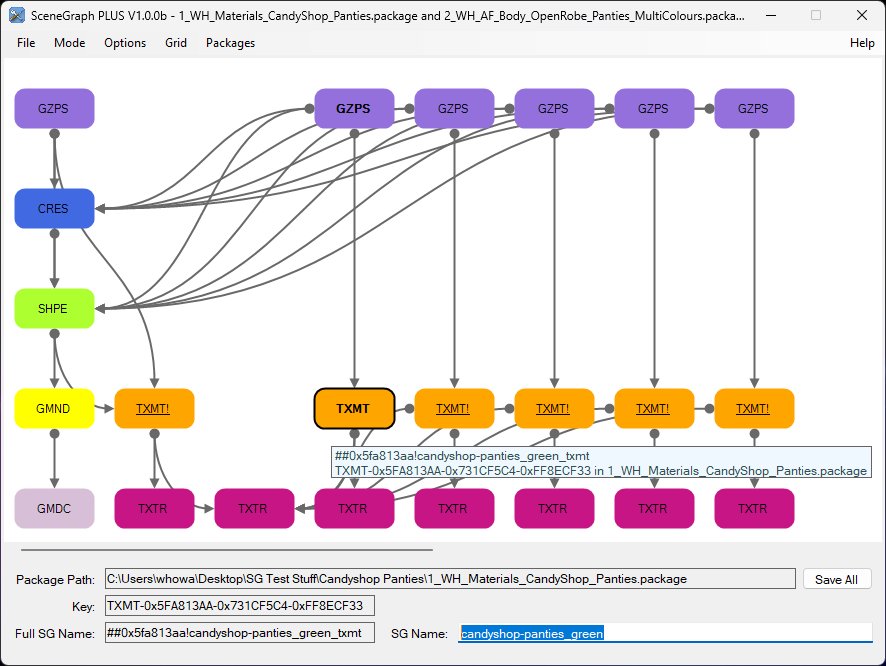
Note: Changing a scenegraph resource (CRES/SHPE/GMND/GMDC/TXMT/TXTR/LIFO) will automatically update the TGI value - there is no need to remember to click "Fix TGI".
With the parent resource name set, right-clicking on a child resource enables the name to be copied.
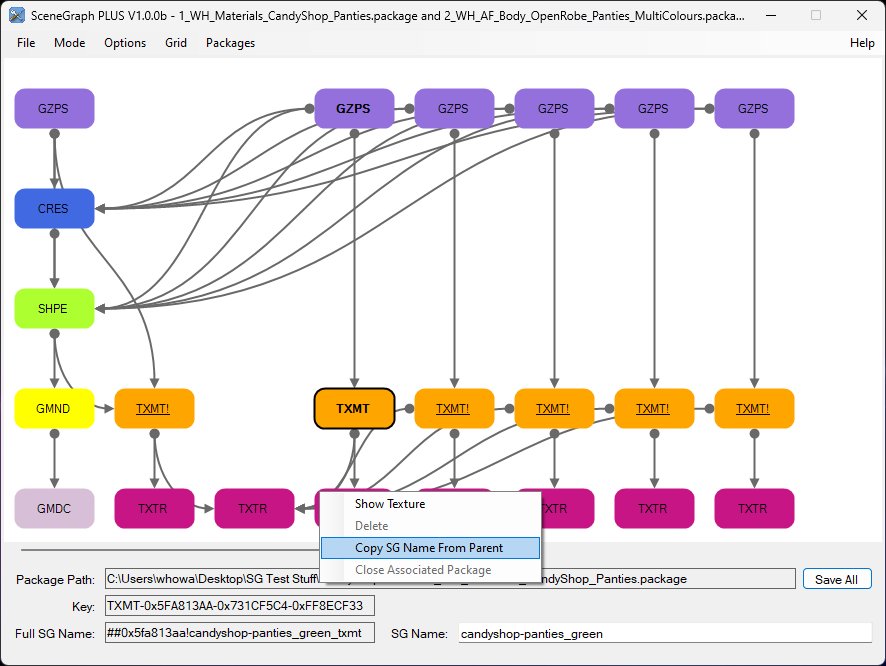
Again, the TGI value is automatically updated.
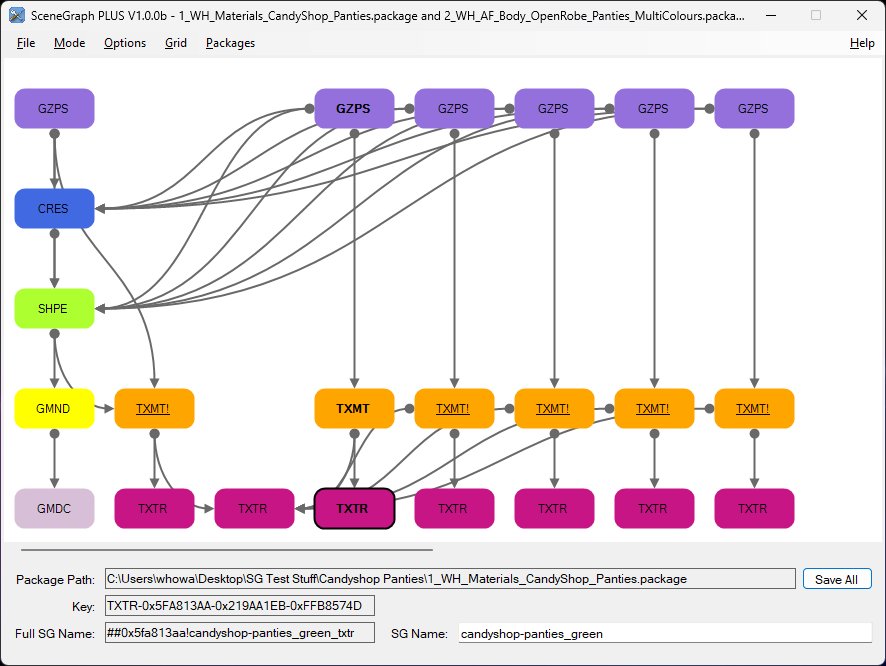
Edited resources are indicated by a bold label.
Note: Although we only changed the TXMT and TXTR resources directly, the GZPS that links to the TXMT is also shown in bold as the associated property in the GZPS has also been updated to reflect the TXMT's name change.
(Watch the video to see this in action!)
To move a resource block, left-click on it and drag it to a new position. Any connectors will redraw as it's moved, making it easy to get the layout desired.
When the block is dropped, if "Drop To Grid" on the "Grid" menu is checked, it will snap to the nearest grid point.
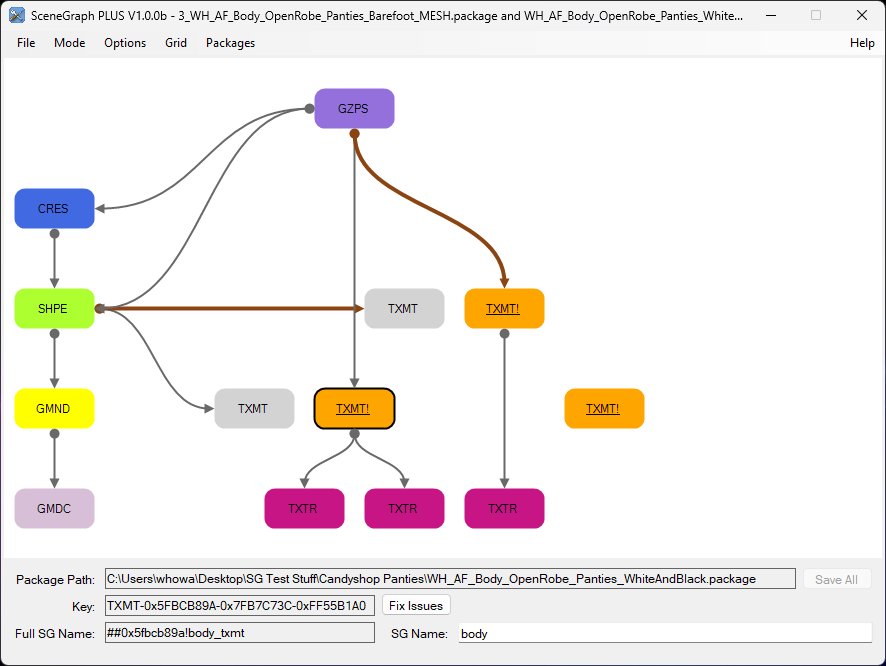
The two missing TXMTs (grey blocks) need to be linked to the two main TXMTs of the recolour.
To link a resource, shift-left-click on a block and drag-and-drop it onto another block of the same type (that is a TXMT can only be dropped onto another TXMT block) - a valid block drop target will be outlined with a dashed border.
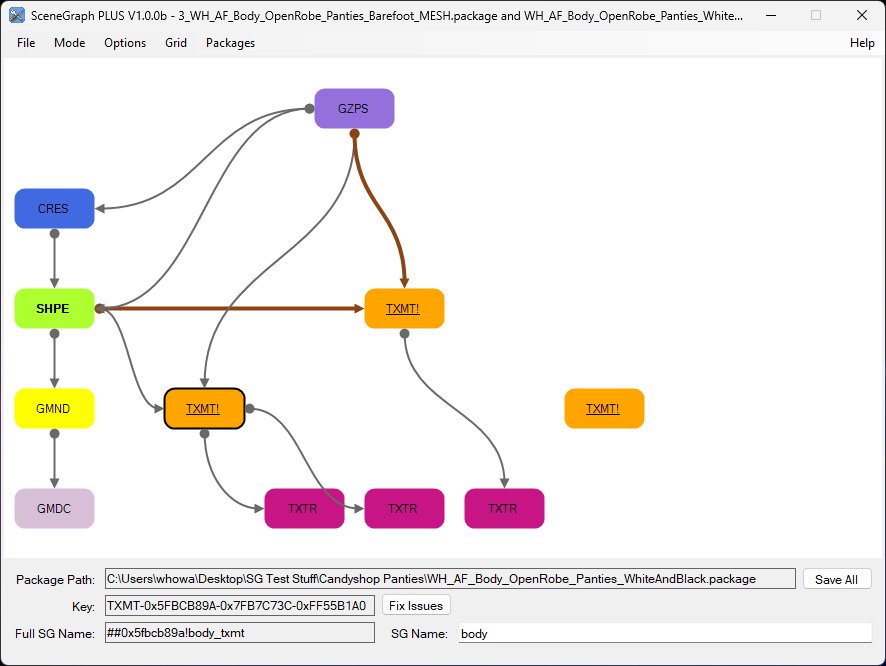
Alternatively, control-left-click on a block and drag-and-drop it onto a connector to another block of the same type - a valid connector drop target will be highlighted.
Most of the time it's easier to drop onto a block, but occasionally it's useful to be able to drop onto a connector.
If a resource has multiple references (connections) to the same child resource, for example, the GZPS where the "robe" and "liner" subsets link to the same material.

And it is necessary to link these to different materials, right-click on the connector and select "Split Multi-Connector".
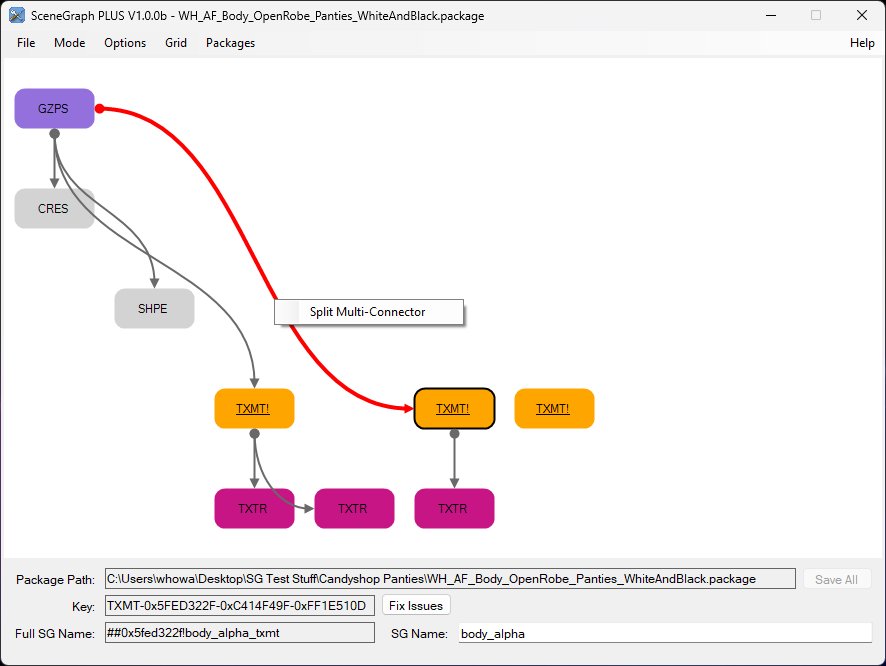
Duplicate blocks of the original child resource will be made and single connections created between the original block and the duplicate(s).
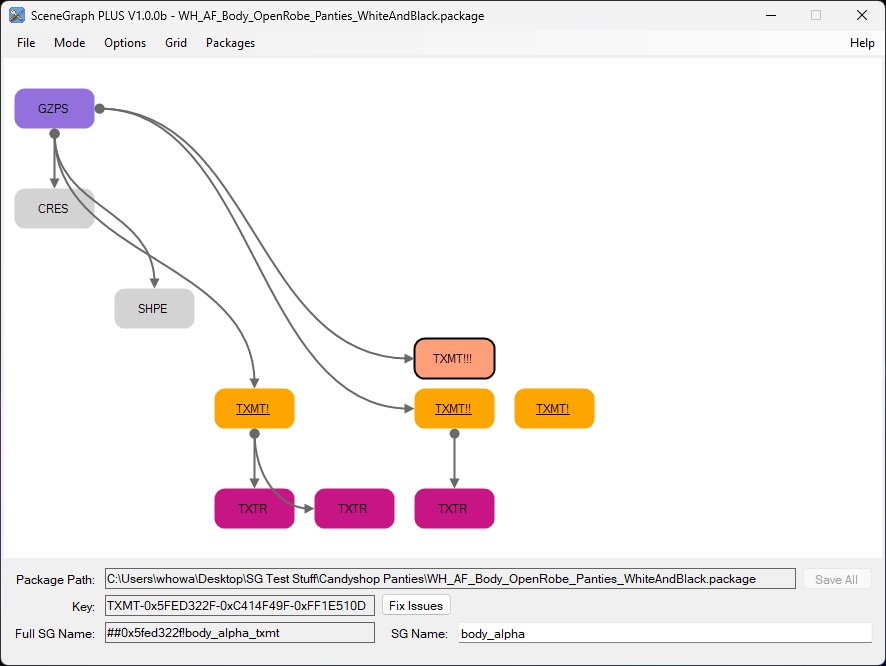
Duplicate blocks are indicated by being pale pink
Changing the name of a duplicate block will update the original.
With the multi-connector split, other resource can be shift-clicked dragged-and-dropped onto the duplicate block(s).
The application detects the following types of issue.
Bad TGIR Value: If the name of the resource does not hash to the correct TGIR value, the block label is displayed in white, and the "Fix TGI" button is visible when the resource is selected.

Bad File List: For TXMT resources, if the File List does not match the referenced TXTR resources, the block label is underlined and followed by an exclamation mark, and the "Fix Issues" button is visible when the resource is selected.
Note: The file list is automatically updated when a TXMT resource is saved, so fixing a TGIR issue or changing the name for the TXMT will also clear the underline and exclamation mark.
Bad Light Names: For light (LAMB, LDIR, LPNT or LSPT) resources, if the names are not as expected, the block label is underlined and followed by an exclamation mark, and the "Fix Issues" button is visible when the resource is selected.
Note: The names are automatically updated when a light resource is saved, so fixing a TGIR issue will also clear the underline and exclamation mark.

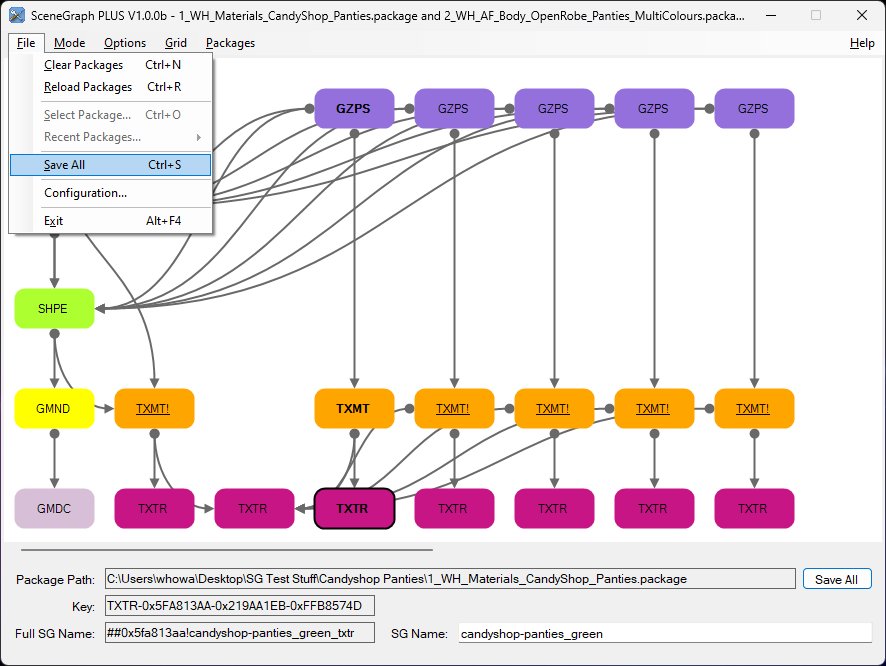
To save any changes, from the "File" menu select the "Save All" option (or press Ctrl-S), or click the "Save All" button. If the "Auto-Backup" item is checked on the "Mode" menu, backup files will be created.
Name Changes: Where a resource's name has been changed:
- the resource's name is updated;
- the resource's "Object Graph Node" name (if any) is updated (see below);
- for a TXMT resource, the Material Definition Description is updated (see below);
- the resource's TGIR value will be recalculated and updated;
Parent Link Changes: Where a resource's name has been changed:
- parent resource(s) that link to this resource will have their references (name or TGIR value) updated.
Child Link Changes: Where a resource's links have been changed (by drag-and-drop of a block onto another block or connector):
- the resource's link(s) to the selected child resource(s) will be updated.
Deletions: Where an orphaned resource has been deleted:
- the resource will be deleted.
Light (LAMB, LDIR, LPNT and LSPT) resources are treated as per Numenor's notes on MTS.
As such, lights cannot be renamed, as their scenegraph name is a combination of their parent's name and their light name.
If a light resource does not follow the naming convention given in the above notes, the block will be marked as having issues and fixing those issues will impose the naming conventions.
CRES, SHPE and GMND resources have an "Object Graph Node".
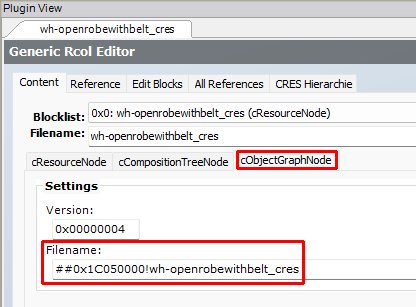
When these resources are saved, the Object Graph Node "Filename" value will be updated as follows:
- If the "Clear All Optional Names" item on the "Options" menu is checked, this value will be cleared (ie set to nothing).
- Otherwise, if the "Always Set Optional Names" item on the "Options" menu is checked, this value will be set correctly based on the resource's new name.
- Otherwise, if the "Filename" was non-blank, this value will be set correctly based on the resource's new name.
- Otherwise, the value is left blank.
Material Definition Description
TXMT resources have a "Material Definition".
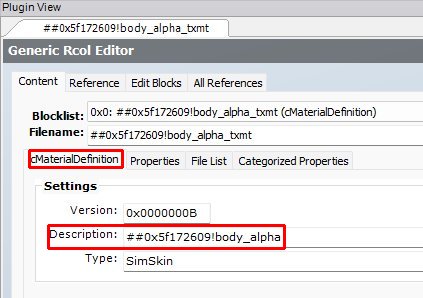
When these resources are saved, the Material Definition "Description" value will be set similarly to how the Object Graph Node is updated (see above) EXCEPT the name will never be cleared (that is, the "Clear All Optional Names" option does NOT apply).
For TXTR and LIFO resources you can display the associated texture by right-clicking on the associated block and selecting "Show Texture".
A separate window will open and display the associated texture. Right click on the window to change its size and enable "auto-zoom". With "auto-zoom" enabled, as the mouse moves over the texture it will display a 64x64 section of it at full resolution (if the window is smaller than the texture size), or a slightly magnified section.
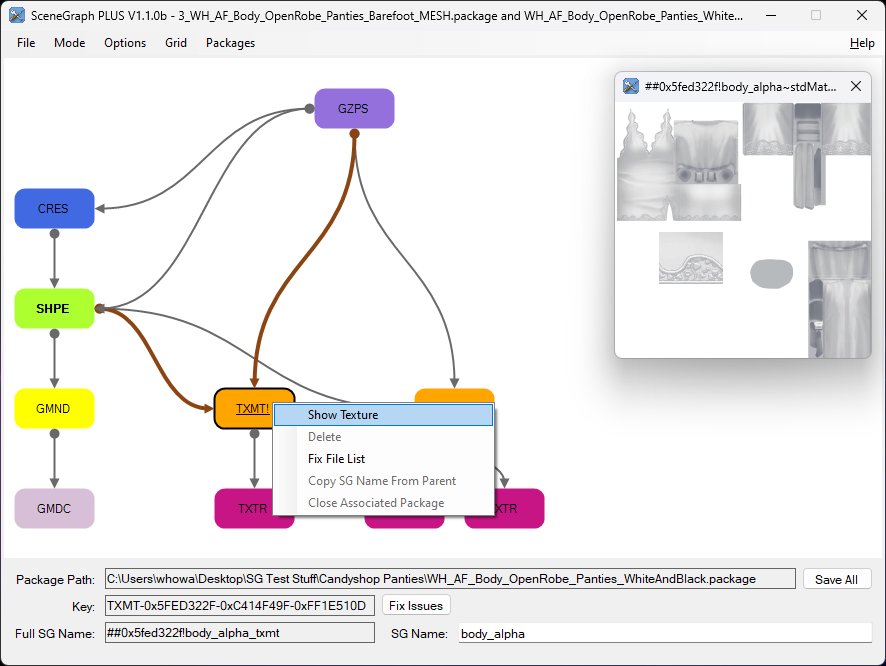
If the texture window is already visible, clicking on a TXTR or LIFO block will also display their associated texture.
For TXMT resources you can display the texture associated with the "stdMatBaseTextureName" property in the same way.
A Resource node (CRES) linking to another CRES is not supported - this is possible, just I've never seen one outside of a Maxis lot .package files.
Clear Packages: Removes all displayed resources and clears the currently selected packages list; if there are unsaved changes a prompt appears.
Reload Packages: Removes all displayed resources and then reloads the currently selected packages. Useful for clearing all edits and relayouts; if there are unsaved changes a prompt appears.
Select Package: Displays the Select Package dialog. Disabled if there are any unsaved changes to the current package(s).
Recent Packages: A list of recently selected packages. Disabled if there are any unsaved changes to the current package(s).
Save All: Saves all changes.
Configuration: Display the standard Sims2Tools configuration dialog.
Exit: Exit the utility; if there are unsaved changes a prompt appears.
Advanced: Controls the display of more advanced menu options.
Auto-Backup: If checked, backup files are created before changes are saved.
Hide Missing Blocks: If checked, missing resource blocks are removed from the display. This setting is NOT saved when the application is closed - this is by design.
Filters: Displays a modal dialog to hide unwanted GZPS/AGED chains (eg only show TF/AF tops)
Connectors Over Blocks: If checked, connectors route over resource blocks.
Connectors Under Blocks: If checked, connectors route under resource blocks.
Clear All Optional Names: (Advanced) If checked, when a resource block is saved, any optional names will be cleared. (See Object Graph Node and Material Definition Description above.)
Always Set Optional Names: (Advanced) If checked, when a resource block is saved, any optional names will be set to it's name. (See Object Graph Node and Material Definition Description above).
Optional Names Have Group Prefix: (Advanced) If checked, optional names will have a "##group!" prefix.
Group Prefix is Lower Case: (Advanced) If checked, the group prefix will use lower case hex digits (eg, 0x1c500000 instead of 0x1C500000).
Realign To Grid: Immediately realigns the resource blocks as if they had all been loaded from the same .package file. This produces the "best guess" layout based on all loaded resources.
Course Grid: (Advanced) If checked, blocks layout further apart than normal.
Normal Grid: (Advanced) If checked, blocks layout at normal spacing.
Fine Grid: (Advanced) If checked, blocks layout closer together than normal.
Drop To Grid: If checked, blocks that are drag-and-dropped via the mouse will snap to the nearest grid alignment point.
(Advanced) A list of currently open packages. If the package doesn't have edits/changes, it can be closed.
Displayed by right-clicking on a block.
Show Texture: For TXMT, TXTR and LIFO blocks, displays the associated texture - see "Texture Viewer" above.
Hide: (Advanced) Hides a top-level block (STR#, MMAT, GZPS, etc).
Hide Chain: (Advanced) Hides a top-level block (STR#, MMAT, GZPS, etc) and its associated chain.
Extract: Extracts a mesh (CRES) or recolour (MMAT/GZPS) chain as a SimPe package.xml file and associated sub-directories.
Fix TGI: Fixes the TGIR value based on the blocks scene graph name.
Fix File List: Fixes a TXMT's file list by matching it to the referenced TXTRs.
Fix Light: Fixes a light (LAMB, LDIR, LPNT or LSPT) - see "Lights" above.
Copy SG Name From Parent: Renames this block by copying the base name of the parent block.
Close Associated Package: Closes the .package file associated with this block as if it had been selected from the "Packages" menu.
Delete: (Advanced) Deletes an orphaned block and its associated resource.
Delete Chain: (Advanced) Deletes a top level block and its associated chain of resources.
Displayed by right-clicking on a connector.
Split Multi-Connector: Splits a multiple connection between two resources into single connections.
- Alt+F - File menu
- Alt+G - Grid menu
- Alt+H - Help menu
- Alt+M - Mode menu
- Alt+O - Options menu
- Alt+P - Packages menu
- Alt+F4 - Exit
- Ctrl+G - Realign To Grid
- Ctrl+H - Hide Missing Blocks
- Ctrl+N - Clear Packages (New)
- Ctrl+O - Select Package (Open)
- Ctrl+R - Reload Packages
- Ctrl+S - Save All
- Ctrl+Shift+O - Connectors Over Blocks
- Ctrl+Shift+U - Connectors Under Blocks
- F1 - Help (about)
The developers of SimPe
Source code can be downloaded from GitHub
- Added option to extract a Maxis GZPS recolour.
- Config Dialog - picking an unsupported version of SimPe now displays a link to this post
- Added support for STR# 0x4132, HLS (UNK: 0x7B1ACFCD), TRKS and AUDIO (INI, SPK, XA, MP3) resources
- Fixed game crash caused by setting a TXMT's cMaterialDefinition:Description value blank for certain Types, that is "Clear All Optional Names" no longer applies to the cMaterialDefinition:Description value
- Added age and gender codes to XMOL and XTOL blocks' displayed info
- Filters now work with XMOL and XTOL resources (NOTE: Filtering is based on the displayed block info, NOT on the age/gender values in the associated resources)
- Added "All" button to Filters dialog to check all ages and genders
- Switched order of "Realign" and "Apply" buttons in Filters dialog as the logical order is "Select Gender, Select Age, Apply, Realign" - which is now a singleleft to right mouse motion
- Ctrl-F opens/shows the Filters dialog
- Filters dialog now remembers its location when the main app is closed with the dialog still visible
- With mesh caches loaded, Maxis blocks that are present in the game files are now outlined the same as "missing but available" custom resources
- With mesh caches loaded, clicking on a Maxis block will display the game file containing that resource
- Connectors from AGED resources now display information about the type of reference
- Added containing .package path to tooltip of available blocks
- Extended right-click "Make Clone(s)" to missing and Maxis blocks
- Fixed issue with files not being closed correctly, leading to issues after the first "Save All" action on the same set of files
- Fixed filter issue with unexpected age codes
- Right-click "Export Mesh" now supports extracting Maxis meshes (requires SimPe correctly configured)
- Ctrl-click on a filter (age or gender) checkbox will uncheck all the other items in the group and then check just the one clicked
- AGED resources display the name of their associated OBJD (if any)
- Holding down the shift key and hovering over a block will display any thumbnail associated from BodyShop (requires cigen.package)
- Added "Preload SG Cache" and "Load SG Cache Now" items to the Options menu (advanced mode)
- With the SG Cache loaded, "missing" but available (ie with an entry in the cache) blocks are outlined in a darker grey (configurable)
- Selecting a "missing but available" block displays the associated .package file in the details area
- Right-click menu for a "missing but available" block to load associated .package file
- Right-click menu for a block with multiple parents to "split" it (ie make N-1 clones)
- Fixed reference to wrong assembly when opening the Configuration dialog
- Fixed bug when re-opening Filters dialog
- Fixed bug where "missing" GZPS resources were always being filtered out
- Filters dialog now re-opens to the last position
- Fixed a bug when correcting an invalid TGI where a CRES->SHPE or GMND->GMDC reference was linked to the resource with the incorrect TGI
- Moved Delete/Delete Chain to bottom of right-click block context menu.
- Added right-click on CRES block to export mesh (CRES/SHPE/GMND/GMDC)
- Added right-click on MMAT/GZPS block to export recolour (MMAT/GZPS/TXMT/TXTR/LIFO)
- Added right-click on top-level block to hide the chain
- Added Options->Filters... to hide unwanted GZPS/AGED chains (eg only show TF/AF tops)
- Fixed bug where MMAT name was being given a _txmt suffix
- Fixed issue when saving after deleting orphan resources and the app still thinking the scenegraph has unsaved changes
- Added support for AGED resources
- Holding down Alt while moving a block will move all the blocks below it in the chain as well
- Added right-context Delete Chain (advanced mode only) - use with caution!!!
- Added ability to hide a top-level block (useful for hiding STR#, MMAT, GZPS et al resources)
- Added support for lights (LAMB, LDIR, LPNT and LSPT)
- Added support for fixing light naming issues
- Initial release

You are free to use my code in any way you want, a credit would be nice, but not required.
Specifically, you may
- reverse engineer the code to figure out how I did it
- modify the code to do something different but similar and redistribute it, provided you change the name of the .package file
- merge my code into your own mod and redistribute it
- merge my code into another mod for your own use. You may redistribute this mod-mod ONLY if the author(s) of the other mod permit it
- Version 1.9 SceneGraphPlusV1.9.zip

